Pages

Showing posts with label Cloud. Show all posts

Friday, October 6, 2017

WAMP and Wordpress Install on AWS Free Tier Windows 2012 R2

AWS provides a 750 hours free tier on Windows machine. I am always wondering how to install wordpress on it to use this free tier instance . Here is all steps I followed today. Most steps are same as WPMU DEV's post "Setting Up WordPress Locally for PC/Windows with WampServer". I do add some of my own experience in the steps.

Basically WampServer = (Apache, PHP, MySQL on Windows). WAMP is the software suite installed on popular Windows operate system, includes Apache, MySQL, PHP and some other tools. It is derived from LAMP which stands for Linux, Apache, MySQL, and PHP. As the name implies, while LAMP is used on Linux servers, WAMP is used on Windows servers.

Note: Microsoft WebPI is another popular way to install wordpress on Windows server. But truly not recommend. I managed to get it working and eventually still find WAMP is better and easier to use.


1. Install AWS Windows Instance

My previous post Launch and Access Amazon AWS EC2 Instances has detailed steps how to launch one. This time , I choose Microsoft Windows Server 2012 R2 Base. I have tried 2016 Base, but since it is only has 1G Ram and 1 virtual core, 2012 is better option. Also keep it in mind , it is 64bit version. Later if you need to install any software, it is best to get 64bit version to do installation. Follow screen, make sure choose right Network (VPC), right Subnet (Availability Zone) and enable auto-assign public ip. I always assign a static private ip for my instance. It is much convenient to do configuration later cross multiple instances.


2. RDP into your windows instance

RDP process is standard. After you decrypted your administrator password, you can RDP to it as long as your security group opened the port. I always create another user and put it into administrators group for future access. In this way, I do not have to decrypt my administrator password each time when I need to access windows machine.

3.  Download and install WampServer 

http://www.wampserver.com/en/ provides you download link. Make sure you are choosing WAMPServer 64 Bits (X64) version. It is 431M file. But download it from AWS instance is just one minute thing.


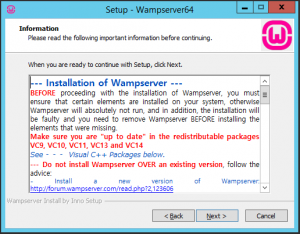
There is one thing you have to be very careful. Before start installation, you will need to install all suggested VC redistributable packages includes vc9, vc10, vc11, vc13 and vc 14.. All download links have been provided in the Setup Information page. You will have to install those VC redistributable packages to start some services later.

4. Launch Localhost site
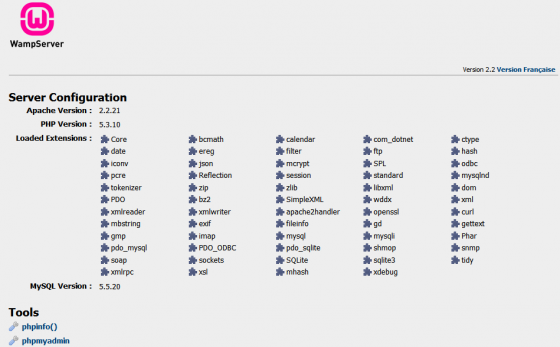
After installed WAMPServer, you should be able to see a green icon on your windows task bar notification area. open http://localhost page from your IE browser. It automatically load c:/wamp64/www/index.php file.

5. Install Wordpress
Download latest wordpress from https://wordpress.org.  Since I like wordpress be my homepage. I copied all extracted files into c:/wamp64/www folder, which is default Web Site folder created by installation of WAMPServer.

5.1 Create wordpress DB 
Launch PhpMyAdmin from http://localhost/phpmyadmin or from WAMPServer green icon.

By default, you can use root user to log in phpMyAdmin without password. Create a new database wordpress for your next step to install Wordpress.


Command line to create a MySql Database:
ubuntu@ip-10-10-0-50:~$ ping mysql2.c33rmuszoxid.us-west-2.rds.amazonaws.com
PING mysql2.c33rmuszoxid.us-west-2.rds.amazonaws.com (10.10.0.117) 56(84) bytes of data.
^C
--- mysql2.c33rmuszoxid.us-west-2.rds.amazonaws.com ping statistics ---
2 packets transmitted, 0 received, 100% packet loss, time 1006ms

ubuntu@ip-10-10-0-50:~$ sudo mysql -h 10.10.0.117 -u johnyan -p
Enter password:
Welcome to the MySQL monitor. Commands end with ; or \g.
Your MySQL connection id is 16
Server version: 5.6.35-log MySQL Community Server (GPL)

Copyright (c) 2000, 2017, Oracle and/or its affiliates. All rights reserved.

Oracle is a registered trademark of Oracle Corporation and/or its
affiliates. Other names may be trademarks of their respective
owners.

Type 'help;' or '\h' for help. Type '\c' to clear the current input statement.

mysql>
mysql> create database wordpress;
Query OK, 1 row affected (0.00 sec)

mysql> show databases;
+--------------------+
| Database |
+--------------------+
| information_schema |
| innodb |
| mysql |
| performance_schema |
| sys |
| wordpress |
| wp |
+--------------------+
7 rows in set (0.00 sec)

mysql> use wordpress;
Database changed


5.2 Configure Wordpress to connect MySql Database

use wordpad or notepad to open wp-config.php file under the folder c:/wamp64/www. change DB_Name, DB_User and DB_Password to the one as show below.

// ** MySQL settings - You can get this info from your web host ** //
/** The name of the database for WordPress */
define('DB_NAME', 'wordpress');

/** MySQL database username */
define('DB_USER', '
root');

/** MySQL database password */
define('DB_PASSWORD', '
');
/** MySQL hostname */
define('DB_HOST', 'localhost');
There is no change on DB_HOST name since wordpress will only need to connect to local MySql. If you are using remote MySQL, that will be your remote DB server's ip address or DNS name.


Use your IE browser to open http://localhost page again. You will get wordpress welcome page :

Enter site title and username / password which will be used to manage your wordpress site. Then you can click Install WordPress button to finish the whole wordpress installation process.


6. Publish Your Own Site to Internet
Now you have installed Wordpress site and it is working fine at http://localhsot this link. How about your own domain such as my netsec.51sec.org. How to get it working with your own domain?

6.1 Get your instance public ip and registered with your domain provider.
From AWS console, you should be able to get an automatically assigned public ip address. This public ip will change each time when you stop or reboot your windows instance. There is no problem if you just use it temporary. Or if you intend to keep it same all the time,  you can get a fixed Elastic IP for free. In my test environment, 34.214.8.80 is one I got as temporary one.

My domain provider is GoDaddy. Under doamin 51sec.org, I added one A record netsec which value is 34.214.8.80. In this way, all request to netsec.51sec.org will be translated to public ip 34.214.8.80, which is my AWS windows instance.

6.2 Open your firewalls. 
There are two firewalls. One is security group on AWS EC2 console. You will need to allow http (tcp 80) opened for 0.0.0.0/0.
Second is local windows firewall which is inside your windows server.

6.3 WAMP Configuration Change for Public Access
Open httpd-vhosts.conf by left one click WAMPServer green icon:
Change ServerName and Server Alias from localhost to netsec.51sec.org.
Also change Require to all granted

# Virtual Hosts
#
<VirtualHost *:80>
ServerName netsec.51sec.org
ServerAlias netsec.51sec.org

DocumentRoot "${INSTALL_DIR}/www"
<Directory "${INSTALL_DIR}/www/">
Options +Indexes +Includes +FollowSymLinks +MultiViews
AllowOverride All
Require all granted
</Directory>
</VirtualHost>


6.4. Restart All Services from WAMPServer green icon. 

6.5. Change WordPress SiteURL and home Configuration
Since your wordpress was configured to use localhost, the siteurl and home configuration is set to http://localhost. They will need to change to http://netsec.51sec.org.

7. Make WAMP services Start Automatically

7.1 Log in as an administrator.
7.2 Start -> Run "services.msc"
7.3 Right click the service wampapache (may also be called wampapache64). Go to properties and set start-up type to 'Automatic'
If you want MySQL to also be available on startup, then repeat step 3 for  wampmysqld  (or  wampmysqld64)


That is it. Now you should be able to get a published Wordpress site with your own domain name. AWS free tier windows 2012 R2 base server is enough to host a wordpress site with a couple of thousand visitors per day.  

References:


Wednesday, September 27, 2017

Launch and Access Amazon AWS EC2 Instances

Amazon Web Services (AWS) is a secure cloud services platform, offering compute power, database storage, content delivery and other functionality to help businesses scale and grow. Millions of users are currently leveraging AWS cloud products and solutions to build sophisticated applications with increased flexibility, scalability and reliability.

In this post, I recorded all steps regarding how to launch a free tier AWS instance and how to use a client to access the instance.
1. Launch a EC2 Instance
1.1 Access Amazon AWS site :


1.2 Log in AWS Management Console:
Click Compute - EC2 to access EC2 dashboard.


By default, you will have a default VPC created when you created your account. You will have three pre-created subnets inside default VPC to isolate resources and one route table, also one default Internet gateways that can be used to provide access to inside resources from outside default VPC, and one allow any any Network ACL with two rules inside. Default security group will be created for you with some default inbound and outbound rules.

There will be no Elastic IPs, no Endpoints, no NAT Gateways, etc..

Note: You may want to create your own VPC, but the process will be different than this post. You will need to do following steps to get your VPC functional properly with outside:

  • Create a new VPC - for example : 51sec-VPC
  • Create at least a new Subnet for your EC2 instances : for example 10.10.0.0/24 for your public network
  • Create a new Internet Gateways and assigned to this new VPC 
  • Create a default route : 0.0.0.0/0 and gateway will be previous step created Internet Gateway.
  • Create your new EC2 instance in new created VPC. During creating EC2 instance step, you can create your own Security Group (Firewall) and new Key pair. If you already has existing one, you can choose existing security group and key pair. 
  • Optional but strongly suggested : Allocate a new Elastic IP. But remember, first Elastic IP is free when it assigned to a running Instance. Else it will be charged for 0.005 for each hour when it is not assigned to a running Instance.
  • Now your Instance should be good to communicate with Internet
  • One Year Free Tier: Linux Instance 750 hours / month, Windows Instance 750 hours / month. 
The following table lists Free Tier Usage Limit. 
ServiceMonth-to-date actual usageMonth-end forecasted usageFree Tier usage limitStatus
EC2 - Linux17.00 Hrs2.27%18.89 Hrs2.52%750 Hrs
EBS - Volumes0.45 GB-Mo1.51%0.50 GB-Mo1.67%30 GB-Mo
S3 - Puts3.00 Requests0.15%3.33 Requests0.17%2,000 Requests
EC2 - Windows1.00 Hrs0.13%1.11 Hrs0.15%750 Hrs
S3 - Gets4.00 Requests0.02%4.44 Requests0.02%20,000 Requests
KMS - Requests4.00 Requests0.02%4.44 Requests0.02%20,000 Requests

1.3 Launch Amazon Linux 2017.03.1 (HVM), SSD Volume Type Instance:

1.4 Configure Instance:

note: make sure you enabled auto-assign public ip. Others can be default. If you did not create your own vpc, you can use default vpc. In this way, you do not have to create subnets, routes ,routing table, and Internet gateway.

1.5 Create a new key pair and download it

1.6 Check new created instance from EC2 Dashboard


From the instance description tab, we can see there is a new public ip 52.60.229.194 assigned to it.

Youtube Video:1. Launch AWS Instance - Ubuntu


2. Access Linux Instance

2.1 Linux Machine


2.1 Putty on Windows


2.2 SecureCRT on Windows

After you entered correct ssh ip address, choose right public key pair file and entered right user name ec2-user, you will get the following screen:


__| __|_ )
_| ( / Amazon Linux AMI
___|\___|___|

https://aws.amazon.com/amazon-linux-ami/2017.03-release-notes/
2 package(s) needed for security, out of 2 available
Run "sudo yum update" to apply all updates.
[ec2-user@ip-172-31-30-151 ~]$
sudo su
[root@ip-172-31-30-151 ec2-user]#


YouTube Video: 2. SSH Access AWS Instance - SecureCRT


2.4 SCP to Instance


3. Access Windows Instance

3.1 RDP

Make sure security group allows RDP access from Internet.
Download remote desktop file:
Generate your administrator password with your public key pair file: 

Double Click downloaded RDP file and enter your decrypted administrator password, you should be able to connect to your windows instance.


4. Troubleshooting Access Issues
a. Without Proper Security Group Rules (Stateful Firewall Rules)
Default Security Group Rule will allow you access your EC2 instance. Following  screenshot shows ssh (tcp 22) and icmp allowed from all networks.


b. VPC network ACLs - inbound and outbound rules
Network ACLs are stateless firewall. You have to make sure inbound and outbound rules allowing your ssh traffic. By default it allows any to any on any services ports.

c. VPN Routing Tables and Internet Gateway
Please make sure routing table has a default route 0.0.0.0/0 pointing to your Internet Gateway.


Sunday, September 24, 2017

Creat AWS Diagrams Online

I was looking for some online tools to create impressive AWS diagram for my learning process. Most of online diagram websites provide certain free usages. Here are some websites I found useful to me.


1. AWS 3D Diagram from Cloudcraft.co


It is quite impressive when I started to make my first diagram. Limit grid size is a big pain when you try to draw a detail diagram for your AWS VPC, but it is good enough to draw a three tier application deployment. 

Cloudcraft allows registered user to create AWS diagrams for free using all available components with some feature limited. Upgrade to Cloudcraft Pro for import of live AWS data and unlimited size diagrams. It can automatically calculate the cost for your design, and  also provides live connection to your AWS account. The smart components feature makes it much easier to connect other components you lay on the grid than any other websites I tried. Love it. So far, I think it is best site for me .

Monthly $49 can get your subscription to pro level to unlock those restrictions.


2. AWS 3D Diagram from Draw.io

Draw.io isn't the best flowchart or diagramming app, but it does provides some good feature which not provided by other online diagram websites.. It supports to save your diagram to popular online drive such as google drive.


Draw.io link

3. Creatly.com


https://creately.com/diagram/j65d4l5h1/rpf095YPTUskQXJM07Opn0du0tI%3D


https://creately.com/diagram/j6wia9sb2/2VPCs+Prod+UAT+Services


4. AWS Simple Icons for Architecture Diagrams


PPT
Microsoft PowerPoint
AWS Simple Icons for PowerPoint (PPTX)


VISIO
Microsoft Visio Stencil
AWS Simple Icons for Microsoft Visio 2003 - 2013 (VSS & VSSX)


EPS / SVG
EPS & SVG Formats
AWS Simple Icons in SVG and EPS (ZIP)


SKETCH
Sketch Format
AWS Simple Icons for Sketch (ZIP)


Building a 3S (Scalable, Stable and Secure) AWS Test Environment - Part 2


3.  Building a scalable AWS architecture (ELB, ASG, RDS)

  • create your security groups
  • create your EC2 keypari
  • create your RDS SQL instance
  • Bake your amazon machine image
  • create your launch configuration
  • create your auto-scaling group
  • create your elastic load balancer
  • test, break, fix, celebrate

3.1 Create your security groups (Firewall)


When you launch an instance in a VPC, you can assign up to five security groups to the instance. Security groups act at the instance level, not the subnet level. Therefore, each instance in a subnet in your VPC could be assigned to a different set of security groups. If you don't specify a particular group at launch time, the instance is automatically assigned to the default security group for the VPC.

Security groups are stateful — if you send a request from your instance, the response traffic for that request is allowed to flow in regardless of inbound security group rules. Responses to allowed inbound traffic are allowed to flow out, regardless of outbound rules.


3.2 Create your EC2 keypari
Amazon EC2 – The Amazon Elastic Compute Cloud (Amazon EC2) service enables you to launch virtual machine instances with a variety of operating systems. You can choose from existing Amazon Machine Images (AMIs) or import your own virtual machine images.

Access Amazon AWS EC2 Instances


3.3 Create your RDS SQL instance


3.4 Bake your amazon machine image


3.5 Create your launch configuration


3.6 Create your auto-scaling group


3.7 Create your elastic load balancer


Images / Snapshot


The major difference is between the type of service referred to. A snapshot is of an EBS volume where you are able to save state and reboot with the same data at a certain point in time.

An AMI is similar, but its for the EC2 instances themselves. You cannot take a snapshot of a non ebs backed instance, but you can create a AMI (system image) of one.

Generally I use EBS snapshots as backup solutions for a database volume and I use an AMI to save instance configuration