Pages

Showing posts with label Software. Show all posts

Friday, October 6, 2017

WAMP and Wordpress Install on AWS Free Tier Windows 2012 R2

AWS provides a 750 hours free tier on Windows machine. I am always wondering how to install wordpress on it to use this free tier instance . Here is all steps I followed today. Most steps are same as WPMU DEV's post "Setting Up WordPress Locally for PC/Windows with WampServer". I do add some of my own experience in the steps.

Basically WampServer = (Apache, PHP, MySQL on Windows). WAMP is the software suite installed on popular Windows operate system, includes Apache, MySQL, PHP and some other tools. It is derived from LAMP which stands for Linux, Apache, MySQL, and PHP. As the name implies, while LAMP is used on Linux servers, WAMP is used on Windows servers.

Note: Microsoft WebPI is another popular way to install wordpress on Windows server. But truly not recommend. I managed to get it working and eventually still find WAMP is better and easier to use.


1. Install AWS Windows Instance

My previous post Launch and Access Amazon AWS EC2 Instances has detailed steps how to launch one. This time , I choose Microsoft Windows Server 2012 R2 Base. I have tried 2016 Base, but since it is only has 1G Ram and 1 virtual core, 2012 is better option. Also keep it in mind , it is 64bit version. Later if you need to install any software, it is best to get 64bit version to do installation. Follow screen, make sure choose right Network (VPC), right Subnet (Availability Zone) and enable auto-assign public ip. I always assign a static private ip for my instance. It is much convenient to do configuration later cross multiple instances.


2. RDP into your windows instance

RDP process is standard. After you decrypted your administrator password, you can RDP to it as long as your security group opened the port. I always create another user and put it into administrators group for future access. In this way, I do not have to decrypt my administrator password each time when I need to access windows machine.

3.  Download and install WampServer 

http://www.wampserver.com/en/ provides you download link. Make sure you are choosing WAMPServer 64 Bits (X64) version. It is 431M file. But download it from AWS instance is just one minute thing.


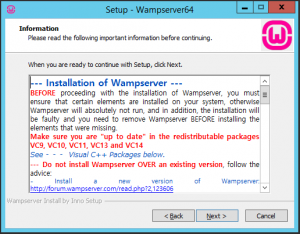
There is one thing you have to be very careful. Before start installation, you will need to install all suggested VC redistributable packages includes vc9, vc10, vc11, vc13 and vc 14.. All download links have been provided in the Setup Information page. You will have to install those VC redistributable packages to start some services later.

4. Launch Localhost site
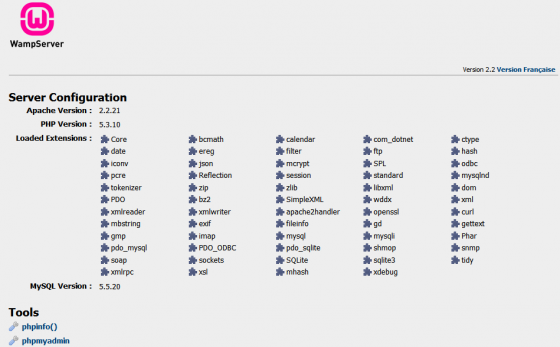
After installed WAMPServer, you should be able to see a green icon on your windows task bar notification area. open http://localhost page from your IE browser. It automatically load c:/wamp64/www/index.php file.

5. Install Wordpress
Download latest wordpress from https://wordpress.org.  Since I like wordpress be my homepage. I copied all extracted files into c:/wamp64/www folder, which is default Web Site folder created by installation of WAMPServer.

5.1 Create wordpress DB 
Launch PhpMyAdmin from http://localhost/phpmyadmin or from WAMPServer green icon.

By default, you can use root user to log in phpMyAdmin without password. Create a new database wordpress for your next step to install Wordpress.


Command line to create a MySql Database:
ubuntu@ip-10-10-0-50:~$ ping mysql2.c33rmuszoxid.us-west-2.rds.amazonaws.com
PING mysql2.c33rmuszoxid.us-west-2.rds.amazonaws.com (10.10.0.117) 56(84) bytes of data.
^C
--- mysql2.c33rmuszoxid.us-west-2.rds.amazonaws.com ping statistics ---
2 packets transmitted, 0 received, 100% packet loss, time 1006ms

ubuntu@ip-10-10-0-50:~$ sudo mysql -h 10.10.0.117 -u johnyan -p
Enter password:
Welcome to the MySQL monitor. Commands end with ; or \g.
Your MySQL connection id is 16
Server version: 5.6.35-log MySQL Community Server (GPL)

Copyright (c) 2000, 2017, Oracle and/or its affiliates. All rights reserved.

Oracle is a registered trademark of Oracle Corporation and/or its
affiliates. Other names may be trademarks of their respective
owners.

Type 'help;' or '\h' for help. Type '\c' to clear the current input statement.

mysql>
mysql> create database wordpress;
Query OK, 1 row affected (0.00 sec)

mysql> show databases;
+--------------------+
| Database |
+--------------------+
| information_schema |
| innodb |
| mysql |
| performance_schema |
| sys |
| wordpress |
| wp |
+--------------------+
7 rows in set (0.00 sec)

mysql> use wordpress;
Database changed


5.2 Configure Wordpress to connect MySql Database

use wordpad or notepad to open wp-config.php file under the folder c:/wamp64/www. change DB_Name, DB_User and DB_Password to the one as show below.

// ** MySQL settings - You can get this info from your web host ** //
/** The name of the database for WordPress */
define('DB_NAME', 'wordpress');

/** MySQL database username */
define('DB_USER', '
root');

/** MySQL database password */
define('DB_PASSWORD', '
');
/** MySQL hostname */
define('DB_HOST', 'localhost');
There is no change on DB_HOST name since wordpress will only need to connect to local MySql. If you are using remote MySQL, that will be your remote DB server's ip address or DNS name.


Use your IE browser to open http://localhost page again. You will get wordpress welcome page :

Enter site title and username / password which will be used to manage your wordpress site. Then you can click Install WordPress button to finish the whole wordpress installation process.


6. Publish Your Own Site to Internet
Now you have installed Wordpress site and it is working fine at http://localhsot this link. How about your own domain such as my netsec.51sec.org. How to get it working with your own domain?

6.1 Get your instance public ip and registered with your domain provider.
From AWS console, you should be able to get an automatically assigned public ip address. This public ip will change each time when you stop or reboot your windows instance. There is no problem if you just use it temporary. Or if you intend to keep it same all the time,  you can get a fixed Elastic IP for free. In my test environment, 34.214.8.80 is one I got as temporary one.

My domain provider is GoDaddy. Under doamin 51sec.org, I added one A record netsec which value is 34.214.8.80. In this way, all request to netsec.51sec.org will be translated to public ip 34.214.8.80, which is my AWS windows instance.

6.2 Open your firewalls. 
There are two firewalls. One is security group on AWS EC2 console. You will need to allow http (tcp 80) opened for 0.0.0.0/0.
Second is local windows firewall which is inside your windows server.

6.3 WAMP Configuration Change for Public Access
Open httpd-vhosts.conf by left one click WAMPServer green icon:
Change ServerName and Server Alias from localhost to netsec.51sec.org.
Also change Require to all granted

# Virtual Hosts
#
<VirtualHost *:80>
ServerName netsec.51sec.org
ServerAlias netsec.51sec.org

DocumentRoot "${INSTALL_DIR}/www"
<Directory "${INSTALL_DIR}/www/">
Options +Indexes +Includes +FollowSymLinks +MultiViews
AllowOverride All
Require all granted
</Directory>
</VirtualHost>


6.4. Restart All Services from WAMPServer green icon. 

6.5. Change WordPress SiteURL and home Configuration
Since your wordpress was configured to use localhost, the siteurl and home configuration is set to http://localhost. They will need to change to http://netsec.51sec.org.

7. Make WAMP services Start Automatically

7.1 Log in as an administrator.
7.2 Start -> Run "services.msc"
7.3 Right click the service wampapache (may also be called wampapache64). Go to properties and set start-up type to 'Automatic'
If you want MySQL to also be available on startup, then repeat step 3 for  wampmysqld  (or  wampmysqld64)


That is it. Now you should be able to get a published Wordpress site with your own domain name. AWS free tier windows 2012 R2 base server is enough to host a wordpress site with a couple of thousand visitors per day.  

References:


Wednesday, September 20, 2017

My Top Internet / Network Tools

There are lots of useful sites which helps the troubleshooting procedures. I listed some common tools or websites used by myself. Please let me know what you are using and I would like to try them and add them into this list.

1. Internet/Network Tools Portal
Ping – Shows how long it takes for packets to reach host
Traceroute – Traces the route of packets to destination host from our server
DNS lookup – Look up DNS record
WHOIS – Lists contact info for an IP or domain
Port check – Tests if port is opened on specified IP
Reverse lookup – Gets hostname by IP address
Proxy checker – Detects a proxy server
Bandwidth meter – Detects your download speed from our server
Network calculator – Calculates subnet range by network mask
Network mask calculator – Calculates network mask by subnet range
Country by IP – Detects country by IP or hostname
Unit converter – Converts values from one unit to another
DNS checks detailed dns information for a hostname ( www.facebook.com , www.yahoo.com , www.youtube.com )
IP-number checks ip number information such as dns reverse and forwards
route checks a specific routed prefix
AS numbers checks information on an AS-number
AS macros checks who belongs to an AS-macro

2. Speed Test


3. IP Subnet Calculator


4. Network Monitoring Related


5. DNS and Domain Name Related


6. BGP Toolkit

Choose any one of servers by clicking the spot and it will bring you to this kind of link: telnet://route-views.on.bb.telus.com 

route-views.ab>show bgp paths 47102
Address    Hash Refcount Metric Path
0x666C2980 2421        0      0 852 3257 4436 23498 47102 47102 i

route-views.ab>sh ip bgp 199.xxx.xxx.0
BGP routing table entry for 199.xxx.xxx.0/24, version 82108513
Bestpath Modifiers: deterministic-med
Paths: (1 available, best #1)
  Not advertised to any peer
  852 3257 4436 23498 47102 47102
    154.11.98.17 from 154.11.98.17 (154.11.0.71)
      Origin IGP, localpref 100, valid, external, best
      Dampinfo: penalty 1304, flapped 4 times in 00:14:31


7. Your Public IP Address


8. Online Diagram Drawing Sites


9. Snmp tools


10. HTTP and HTTPS Check Tools


    11. Email Diagnostic Tools


    12. Proxy Sites


    13. Remote Support / Online Meeting


    14. Remote (SSH / Telnet) Access Tools


    15. NTP Server


    16. Portable Software


    Before you click away to do some heavy network security reading, please leave a comment and share your favorite network and security tools so that I can add them to my list!


    Thursday, May 18, 2017

    Using Artica Squid Open Source Project to Build Powerful and Safe but Simple to Use Proxy

    Looking for a pre-installed GUI based Proxy for a while and found Artica recently. The feature is pretty attractive and GUI interface looks cool.

    What is Artica?
    "Artica Proxy is an appliance that claim to manage Squid-cache proxy with all features that Squid Cache provides.With the Artica Web interface you can monitor, manage get statistics of your proxy service.
    Artica Proxy provides ISOs in order to build a full proxy appliance without any technical skills.
    Artica Proxy allows to enable Web filtering engine with more than 30.000.000 categorized websites.

    Other features included such as reverse-proxy, RDP proxy, VPN, DHCP, DNS..."
    Here are some my experience on it.

    1. Download Link:
     http://artica-proxy.com/telechargements/

    There are ISO, ESXi, Hyperv, Xen versions to download.


    2. Installation in Vmware Workstation 
    In this post I am using Vmware Workstation 10 to do installation based on Artica Proxy CD-ROM ISO. The vm's configuration is set as following:


    Hard Drive = 20G
    CPU = Dual CPU with 2 Core
    Memory = 3G
    Delete other unused hardware such as printer, usb and sound card.


    Full installation will take 15- 20 minutes depends on your host performance. Basic configuration wizard will take you 5 minutes to get a full functional Proxy for your internal machines.

    2.1 Update to latest release


    Current IOS version is 3.03.041314. It can be upgraded to 3.06.050915 by some clicks.


    3. Test Proxy


    Config client IE proxy with 192.168.236.100 on port 3128.


    By default, Artica proxy will allow all internal machines to use proxy to surf internet. You wont need to do too much work to get all your clients to use this new proxy.


    4. Artica Support

    Artica Support is amazing. I have been tried to open tickets in their tracker system, in next a couple of hours they posted videos to answer my dummy questions. Artica also has a forum to let users discuss there.

    5. Configuration Examples

    Example 1: Using ACLs
    1.1 Default block everything from Internal to Internet
    1.2 Create a specific rule to allow one machine 192.168.5.53 to access some specific sites based on IP addresses or URL Domain names


    Example 2: Using Web-Filtering
    2.1 Default block everything from Internal to Internet
    2.2 Create a specific rule to allow one machine 192.168.1.136 to access to categories News and Search Engines only


    6. Reference


    Saturday, October 29, 2016

    Windows 10 Tips and Tricks

    1. Install Telnet Client

    Option 1 – From Control Panel

    1. Open “Control Panel“.
    2. Open “Programs“.
    3. Select the “Turn Windows features on or off ” option.
    4. Check the “Telnet Client” box.
    5. Click “OK“. A box will appear that says “Windows features” and “Searching for required files“.When complete, the Telnet client should be installed in Windows.

    Option 2 – From Command Line

    You can also install the Telnet Client by issuing a command.
    1. Hold down the Windows Key, then press “R“.
    2. The Run dialog box appears. Type:
      • pkgmgr /iu:”TelnetClient”
    3. Select “OK” and Windows will install the Telnet client.


    2. Check System Uptime

    Option 1 – From Task Manager

    1. Bring up the Task Manager by right-clicking the clock in the lower-right corner of the taskbar and selecting Task Manager. Alternately, you could press CTRL + ALT +Delete.
    2. Select the “Performance tab. If you cannot see tabs, select the “More details” option.
    3. You can see system uptime located toward the bottom of the window. This will provide you with a live time period on how long the system has been on.Win 8 task manager with system uptime

    Option 2 – Via Command

    You can also see system uptime by using the command prompt.
    1. Select “Start“.
    2. Type “cmd, then press “Enter.
    3. Type “net stats server, then press “Enter.
    4. Toward the top of the output, there is a line that says “Statistics Since…” that will show the time the computer last came online. It provides other data too, such as sessions accepted, amount of data sent, system errors, and print jobs spooled.
    Stats output on command line
    The “net stats server” command can also be used in many previous versions of Microsoft Windows.

    3. Hiding Windows Folder
    下面我教朋友一个Attrib命令,可以让文件夹彻底的

    隐藏起来,就算是在文件夹选项中设置了显示隐藏文件夹,也无法显示出来的。只能通过路径访问的方式打开文件夹。如:我想把

    D盘根目录下的“maopian”文件夹隐藏起来,点击【开始】-【运行】,在【运行】中输入“cmd”,回车,在弹出的在命令行窗口下

    输入“attrib +s +a +h +r D:\maopian”。然后回车就可以了。

            文件夹被隐藏后,当你要打开这个文件夹的时候,可以点击【开始】-【运行】中输入“D:\maopian”打开文件夹,也可以通

    过打开的任意文件夹菜单栏下的地址栏中输入“D:\maopian”打开。

            如果你想重新显示该文件夹的话,可以把attrib的“+”号替换成“-”号。文件夹就可以恢复显示了。
      
            若要隐藏成回收站的图标,只需将回收站下的desk.ini文件拷贝至该文件夹下即可

            具体attrib命令详情,可问度娘


    4. 上帝模式一键开启

    日常操作中,我们经常要对Windows 10进行各种设置,但是默认系统设置都是分布在不同地方,比如有的在控制面板中,有的则在某个系统程序中。这样操作起来就极为不便,不过Windows 10已经内置一个上帝模式的隐藏工具,我们只要手动开启即可将所有设置归集在一个设置窗口。

    首先在桌面上右击选择“新建文件夹”,然后将该文件夹的名称重命名为“some_name.{ED7BA470-8E54-465E-825C-99712043E01C}”,这样以后只要在桌面打开上述文件夹,可以看到现在系统所有设置已经全部集中在此,大家只要按需选择所需的组件即可(图1)。


    图1 开启系统上帝模式

    实际上类似上述{ED7BA470-8E54-465E-825C-99712043E01C}名称,这个叫做类标识符,文件夹名称添加上这样的标识后就变成系统文件夹,比如“我的电脑”对应{20D04FE0-3AEA-1069-A2D8-08002B30309D} ,“我的文档”对应 {450D8FBA-AD25-11D0-98A8-0800361B1103}等。善于为普通文件夹增加类标识符可以实现一些特殊功能,比如上述上帝模式文件夹还可以用来保存私密文件,按住Shift键,右击选中上述目录选择“在新进程中打开”,这样打开的就是一个真正的文件夹,我们可以在其中保存文件,而用户默认双击打开的则是上帝模式(图2)。


    图2 使用“在新进程中打开”可以直接打开文件夹

    5. 历史问题一目了然

    在系统出现问题的时候,我们经常需要在事后进行问题的查找。对于系统曾经发生的问题,Windows 10已经在后台为我们自动记录下来了。在“开始”菜单搜索框输入“可靠性监视”,在打开的程序窗口中,系统会按照时间顺序记录曾经的历史问题,点击相应的问题后不仅可以看到详细的信息,点击“检查解决方案”还可以自动解决大多数常见的系统问题(图3)。


    图3 查看系统历史问题

    如果想查询确定错误报告中涉及的问题,我们同样可以使用快捷命令来进入错误报告查询页面,右击“开始”徽标选择“运行”,接着输入“ control.exe /name Microsoft.ActionCenter /page pageSignoff”,在打开的窗口中即可看到所有问题的解决方案(图4)。


    图4 快速查看解决方案

    6. 一键锁定电脑

    平时需要离开电脑一段时间时,很多朋友都会使用Win+L键或者“开始→用户图标→锁定”的方法锁定电脑。如果觉得上述方法不够快捷,现在可以在桌面新建一个快捷方式,接着在项目的地址上输入“rundll32.exe user32.dll,LockWorkStation”,即使用快捷命令快速锁定电脑(图5)。


    图5 设置锁定快捷命令

    继续点击“下一步”,然后将其名称设置为“锁定电脑”,并且将其图标替换为锁定图标。右击新建快捷方式选择属性,在打开的窗口中为其设置一个快捷键如F2,这样以后只要双击这个图标或者按F2键就可以一键锁定电脑了(图6)。


    图6 设置快捷键

    小提示:

    同样的方法可以为快捷方式设定不同的命令行来实现更多快捷操作,比如将命令行更改为“shutdown /r”,这样可以快速重启电脑,更改为“rundll32.exe shell32.dll,Control_RunDLL appwiz.cpl,,1”可以快速打开“添加/卸载”组件,大家可以根据自己的需要制作更多快捷命令。

    7. 常用程序快捷启动

    为了快速启动系统程序,我们经常直接在“开始”菜单的运行框输入程序的对应名称即可启动。其实对于自己安装的其他程序,我们只要稍加变通即可实现类似功效。比如笔者经常需要启动安装在F盘的股票交易软件“tdxw.exe”,首先进入程序安装目录,然后右击程序选择创建快捷方式,并将快捷方式重命名为容易输入的字符如“td”,将这个快捷方式复制到“C:\windows”保存,如果有多个需要启动的程序,则依次建立多个对应快捷方式(图7)。


    图7 复制快捷方式到系统目录

    完成上述操作后,以后如果我们再需要运行安装在F盘的这个程序,只要右击“开始徽标→运行”,接着在运行框直接输入“td”即可快速启动了(图8)。


    图8 直接输入快捷字符启动程序

    小提示:

    使用类似快捷方式的方法同样可以快捷启动很多系统组件,比如系统默认设置是隐藏系统保护文件夹,这样需要查看系统文件夹时我们就需要先进入文件查看设置取消系统文件夹隐藏才能打开这类文件夹。现在可以使用同样方法快速访问,只要先为隐藏系统目录创建快捷方式并命名为“yc”,以后直接输入“yc”即可快速打开指定隐藏目录了。

    8. 快速以管理员方式启动程序

    为了完成系统设置的更改,对于重要系统组件如cmd.exe、regedit.exe我们经常需要以管理员身份运行,默认情况下只能在找到指定程序后右击选择“以管理员身份”运行才能激活。对于经常需要以管理员身份运行的程序如cmd.exe,现在可以自行为其设定运行方式。首先在桌面为cmd.exe建立一个快捷方式,右击打开快捷方式后选择“快捷方式→高级”,勾选“以管理员身份运行”,这样以后启动快捷方式的身份就是系统管理员了(图9)。


    图9 位快捷方式指定管理员方式运行

    对于平时只是以标准用户使用系统的朋友,如果需要为某一程序指定的管理员账户运行,那么我们还可以通过runas命令进行指定。比如使用regedit.exe编辑系统重要键值的时候,如果需要以管理员身份运行更改。同样首先为上述程序在桌面建立快捷方式,然后在目标位置输入“C:\Windows\System32\runas.exe /savecred /user:cfan regedit.exe”,其中“cfan”是我的本机管理员账户。这样以后只要运行这个快捷方式(首次需要输入管理员账号密码,下次则会自动记住),就会自动以管理员身份启动注册表编辑器了(图10)。


    图10 以特定管理员身份启动程序

    9. 无盘符分区,保护/访问两相宜

    为了保护自己保存资料的分区不被他人随意访问,一些朋友会使用删除驱动器盘符的方式对分区进行保护。但是这样自己需要访问无盘符分区时,需要先为该分区分配盘符,访问完成后又得再次删除盘符才能恢复保护,操作起来极为麻烦。现在可以通过将分区映射到特定文件夹的方法实现保护、访问两相宜。

    首先在任意NTFS分区下建立一个文件夹,假设为“C:\windows\cfan”,接着进入计算机磁盘管理将需要保护分区的盘符删除,点击“新建→装入以下空白NTFS文件夹中”,点击“浏览”选择上述建立的“C:\windows\cfan”文件夹(图11)。


    图11 将无盘符分区装入以下空白NTFS文件夹中

    完成上述操作后启动命令提示符输入“attrib +h +s C:\windows\cfan”,将上述文件夹设置为系统、隐藏属性。这样一般人就无法直接访问上述分区,同时也看不到上述文件夹。以后我们需要访问该分区时,只要按Win+R键,然后在运行框中输入“cfan”即可打开上述无盘符的保护分区了(图12)。


    图12 使用快捷命令访问无盘符分区

    小提示:

    使用同样方法可以将FAT32分区装入到NTFS文件夹中,这样原来FAT分区无法使用的权限保护,现在就可以借助NTFS文件夹“曲线实现”,比如可以设置指定账户才能访问上述分区(实际是访问装入的文件夹)。

    另外请注意,上述删除分区盘符的操作有一定风险,建议最好先将要隐藏分区上的数据在其他地方做好安全备份,然后再尝试。

    上述方法实际上是为特定分区增加一个目录链接,因此对于其他保护分区也可以使用同样方法实现。比如现在很多UEFI启动的电脑,系统中经常会有一个标示为“EFI”保护分区,默认情况下我们无法在计算机管理中加载和访问。如果现在需要对这样的保护分区进行访问那么使用 MKLINK 命令就可以挂载。以管理员身份打开 CMD,运行以下命令(图13):


    图13 查看本机ESP分区

    #启动diskpart

    Diskpart

    #选择当前活动硬盘

    Select disk 0

    #列出本机所有分区,确定EFI分区序号,标签为ESP即是

    List voloume

    #退出diskpart

    Exit

    #使用命令为指定EFI分区创建目录链接

    MKLINK /J C:\ESP \\?\GLOBALROOT\Device\Harddisk0\Partition8\

    上述命令运行成功之后,C:\ESP就是指向ESP的一个符号链接,以后欲访问EFI分区,直接访问 C:\ESP即可(图14)。


    图14 通过建立目录链接方法访问EFI分区

    10. 更多提效的快捷方法

    双击任意窗口的最左上角都能关闭该窗口

    平常使用高分Windows 10平板用户都会对关闭当前程序窗口头痛,因为默认窗口右上角的关闭按钮很小,经常点击半天无法关闭。其实在Windows 10中,我们只要双击任意窗口的最左上角都能关闭该窗口,显然对于平板用户任意双击比精确点击关闭按钮更简单。

    11. Ctrl+Alt+Del=Ctrl+Shift+Esc

    Ctrl+Alt+Del是我们调出任务管理器的常见快捷方式,但是在普通键盘上这三个键分散得比较远,不容易同时按下,实际上这个快捷键和Ctrl + Shift + Esc等效,这样同时按住都排列在键盘左侧的三键是不是更简单?


    Wednesday, December 23, 2015

    USB to Serial Cable Driver Issue on Windows 10

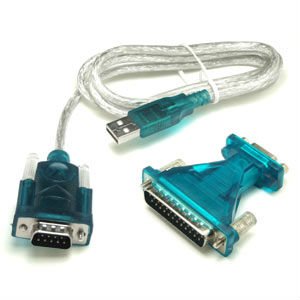
    I have been using a Usb-to-Serial cable for many years without problem at windows xp and windows 7 system. Just recently upgraded to windows 10 , the cable does not work properly any more.

    The Prolific USB-to-Serial Comm Port shows not working properly in the system Device Manager. There is a yellow exclamation mark next to my Prolific USB in device manager as shown below screenshots:
    Device Status of the Device's Property shows:


        This device cannot start. (Code 10)
        A device which does not exist was specified.


    This error is basically saying that Windows, for one reason or another, cannot communicate properly with one of your programs. This communication problem is usually caused by out-of-date, missing or corrupt device drivers. 
    To resolve Error Code 10, I have followed following recommended steps found from Internet:
    1. Reboot your computer – this is always a first step to resolving any problems, if it works – great, if not – proceed to the next step!
    2. Select Start > All Programs > Windows Update
    3. Right-click on My Computer
    4. Click Properties > Hardware menu tab  > Device Manager
    5. Double-click the device that is causing the error (there will be a yellow triangle with exclamation mark to the left of it)
    6. Right-click the specific device and select Properties
    7. Click on the Driver menu tab and select Update Driver
    8. Windows may ask for the path of the driver in which case you will need to either insert your Drivers disk (if you have it) or download the Drivers from the manufacturers website
    9. Restart your computer
    Unfortunately those steps do not work in my case. By Googling Internet, I found some explanation:
    "What has happened is that there have been counterfeit "Prolific" chips coming from China. The counterfeit chips use the same Vendor ID (VID_067B) and Product ID (PID_2303) as the authentic Prolific chips. So, Prolific made changes to their newest drivers to render the adapters using counterfeit chips unusable. Unfortunately, it renders all earlier adapters inoperative and so you have to go out and buy new ones. Planned obsolescence? Getting a working driver installed for the average user is almost impossible."
    So by default windows 10 will automatically install Windows WDF WHQL Driver v3.6.78.350 (06/05/2015) drivers for your device. Unfortunately the old chips sometimes do not work well with this new driver because of reason mentioned above. 
    I am thinking maybe some old drivers may still works for my device. I started to google and try to download and install some other version drivers such as 3.0.0.10, 3.0.1.0 and  3.3.11.152,   finally found 3.3.11.152 is working fine for my old usb-to-serial device.
    1. Download the correct driver

    Download from this link:    USB-SERIAL Driver V3.3.11.152
    Unzip and run the installer, "PL2303_Prolific_DriverInstaller_v1210.exe".

    2. Change Default Driver to version 3.3.11.152


    3. Verify from Device Manager